The working principle of a felling wedge is a simple one. It supports the tree trunk/bole, preventing the saw from being bound into the compression zone. Alternatively, it is used for changing the direction of a falling tree when being harvested.
For this application, the wedge acts as the fulcrum that lifts the tree’s centre past its pivot point for it to fall into the opposite direction of lean.
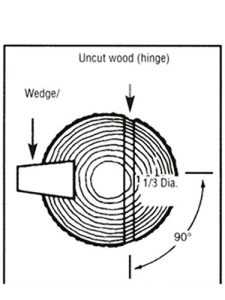
1. Make the Face Notch
First of all, make the forward-facing notch point toward the desired fall. This notch should open at 70 degrees for maximum control of the tree direction and minimize the compression force on the wedge.
Also, use the standard notch size of about 1/3 of the tree’s diameter. And to prevent the tree from scarring on the sides of the hinge as it falls, make corner cuts around the notch.
2. Determine the Number of Wedges you Need
Every logging job requires a specific size and number of wedges. While a back-lean can be overcome by using a single wedge, tree sizes come into play when determining how many wedges are used.
A small-sized tree with a slight back-lean warrant fewer wedges than a large-sized tree. Bigger trees would require 3 to 4 wedges to leverage the tree direction of lean and finally tip it over.
Making this determination is a fairly easy process. It requires you to take a couple of measurements. The face notch that will be made and the proper hinging of the tree trunk is also a key part of this process.
Other measurements required are the height of the tree (C), distance from the face of the hinge to the back of the tree lean (A), and the weighted height of lean (B).
3. Calculate the Number of Segments the Tree has
The segments in the tree give you an idea of how much lift every wedge will generate. The size of each segment is the same as the value of measurement A.
To determine how many make up the tree, convert the tree height (measurement C) into inches from feet by multiplying the value by 12.
Then, divide the value of C by the value of measurement A. You get the number of segments that the tree can be divided into. Perhaps you are wondering why this determination is important.
Well, look at it this way. If the tree has, let’s say, 50 segments, then inserting a 1″ wedge into the back cut then hammering it flush with the tree stump moves the opposite corner of the fiftieth segment’s corner by 50 inches.
Therefore, if your measurement B is less than 50 inches, you only need one 1″ wedge to alter its direction of fall. For safety reasons, using more than 2 wedges is not recommended for your safety and those nearby.
But if you determine that you will need more wedges, then don’t have them stacked directly on one another. Otherwise, striking one wedge sends the other flying off because of the uneven compression.
What you should do is have the side of the wedge by the side at 700 apart, then alternately strike each of them at a time. Once the tree is lifted past the pivot centre and starts falling, retreat safely.
4. Make the Felling Cut
After making the notch and figuring out the sizes and number of wedges required, the rest of the process is pretty straightforward.
Cut as you move towards the notch from the other side of the trunk where the tree is leaning. Ensure the cutting point is lined with the centre of the notch.
Stop cutting when there is enough room to fit a wedge without coming into contact with the chain. At the same time, leave a good tree stump to hold the tree in place. Then, you remove the chainsaw before inserting a wedge into the cut with the wedge pointing in the direction you want the tree to fall.
5. Hammer the Wedge in Place
There are two ways of hammering the wedge into place. You can either use a hammer or an axe to pound the wedge right in if you brought one along.
If by the time the wedge is flush with the stump yet the tree hasn’t started to fall, then make another cut while being sure to preserve the hinge and not completely cut the tree.
Then alternate between pounding and cutting on the felling cut.
6. Other Technique
This second technique slightly differs from the one described above. It is mostly used in the logging of heavily forward-leaning trees. The process is quite simple, beginning with you making a shallow notch in the side of the tree where it leans towards. The notch should be about ¼ or 1⁄3 of the diameter.
Next, while holding the saw horizontally to the notch plane, slightly higher, bore out the tree until the bar appears on the other side. Ensure there are enough holding wood and hinge.
If the bar does not cut through to the other side, turn over and bore at the same height so that both bores meet perfectly.
From the bore, move the saw back, leaving sufficient wood to hold the tree in place. Cut all the way back, and then hammer the wedges in place until the tree falls.